Take A Chance

Take A Chance

Setup and Equipment

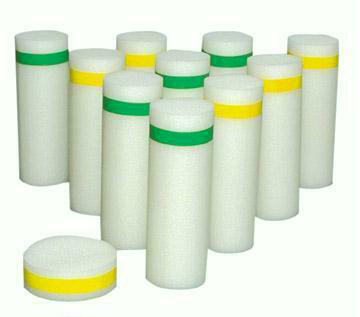
  • Students will be spread out four to six feet apart and spread around the gym floor. It may help to use polyspots or floor markings to designate placement of the targets. It works best to have th will help spread the game out and encourage individual play.
  •  You will need plenty of coated foam balls (preferred) and enough foam targets so there are 3-4 people, without targets, who are left to be the next people into the games when someone’s target is knocked down.
  • To start the game, line up students to pick up a ball and target for most students in the class. They don’t all need a ball to start the game. just a target. They find a spot on the floor to set up their target. There will be  three or four students left to form a line for entering back into the game.
  • Students spread  the targets, so they are they are 4-6  apart from the other players. No placing them in a corner or against a wall.

Guidelines

  • Play begins…
  • The object of the game is to keep your target up while knocking other targets over.
  • Player may not venture more than 2 steps from their target.
  • When a foam target is knocked down -students should bring their target to the line and hand it to the next person in line.
  • They now go to the end of the line and return to the game when they move to the front of the line.
  • Game continues for as long as time permits.
Print Friendly, PDF & Email

School: Long Rope Jumping Activity

 Long Rope Activity for All: School  

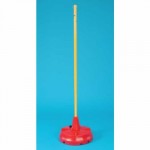
red polejump ropeThis activity works well with grades 1st to 5th.  It’s also a great recess activity.

Equipment: One long rope with one end attached to a wall or pole. At our school we like to attach the rope to a moveable post that can be easily moved around the gym or outside.

  • The teacher is the rope turner.
  • Students line up at one end behind a cone, facing the rope and the teacher begins to turn the rope.
  • Students take individual turns to see if they can pass the grades K-12.
  • One advantage in doing this with a large group of students is that the turns are fast at the start. This gets more involvement with everyone in the line, because they are not just standing and watching everyone else jump. You can certainly continue beyond 12th grade, if the line is shorter and there is time.
  • To pass Kindergarten: Students must run through the rope.
  • 1st Grade: Run into the middle and make one jump, then run out the other side, and run around to the end of the line.
  • Students continue to run in to the middle and make the number of jumps that corresponds to each grade level.
  • If you fail to make the jump for a certain grade, you may try that grade again on your next turn, though we usually give some leeway, so we create a more inclusive atmosphere..
  • It helps to put a line on the floor where the rope hits when you’re turning it. There is a tendency for many students to run past the best place to jump the rope, which is in the center of the rope.

Class Jumping Activity: Work together as a class and see if you can get everyone to run through the rope each time it circles around. The teacher will turn the rope with one full swing in between each turn. Students will really have to focus and run hard to do this. You can have the class do this activity a number of times until they are able to do it together.

Ultimate Class Jumping: Do the same activity as above, but this time work together as a class and see if you can get everyone through the swing of the rope with no extra swings between each student. This will be very challenging for any class to accomplish.

Print Friendly, PDF & Email

Ball Skills Introduction

Equipment and Setup:

  • For Grades K-2 Use playground balls
  • For Grades 3/4/5 Use basketballs
  • Students spread out in their personal space
  • Adjust this list to the level of your students
  • Teacher up front to lead activities

Teacher Leads –  Students Follow

  • Foot Dribble: Bounce ball up to self using foot
  • Hold ankle dribble: Dribble ball while holding one ankle and balancing on one foot.
  • Heel Slap Dribble: Dribble with one hand while slapping your heel with the other
  • Massage and Dribble: Can you rub the back of your neck and dribble a ball?
  • Bounce High: Bounce ball high while ball doesn’t go above hand
  • Bounce Low: Bounce as low as possible
  • Catch while you’re off the floor: Throw ball and catch while jumping
  • Catch as low as you can: Bounce ball and catch as close to the floor as possible
  • Butterfly Drill: Hold ball between legs – do scissors – ball stays between legs
  • Throw back to front: Hold ball in back with both hands and throw in front to catch
  • Throw front to back: Throw ball up and catch it behind your back
  • Throw, jump 360, catch: Throw ball up and make a complete turn and catch
  • Roller ball: Balance ball behind your neck, let the ball roll down your back, then catch ball at your lower back.
  • Floor slap: Throw ball on the floor – slap both hands on floor – then catch
  • Stand to Lying Down Dribble: High dribble, medium dribble, sit on the floor and keep dribbling, then lie down on your back and keep dribbling. Keep dribbling and slowly begin standing up.
  • Homer Simpson: Run in a circle while dribbling your ball in the same place.
  • Monkey Walk: Walk while moving the ball between your legs
  • Crossover Dribble: Dribble right -left- right -left.
  • Heads Up Dribble: Watch the teacher move a ball side-to-side and move accordinglyHold ball in back with both hands and throw in front to catch
  • Homer Simpson: Run in a circle while dribbling your ball on an exact spot on the floor. Then reverse directions. Can you do it while skipping? Skipping backwards?

Basketball/Playground Balls Game and Activity Links

Ball Skills Intro

Dribble Train

Rotating/Stationary Line Passing

Recycle the Basketballs

Polyspot Basketball

Print Friendly, PDF & Email

Hula Hoops and Polyspots

Musical Hula Hoops or Polyspots: These items are interchangeable. We introduce them at separate times.

Take Hoops to Gym Homes (Designated personal space)

  • Stand tall on one foot
  • Low balance on one foot
  • Hop on 2 feet out of hoop – Hop back in – 10 times
  • Hop on one leg out of hoop Hop back in – 10 times
  • Skip around hoop forwards
  • Skip around hoop backwards
  • Jump up and do a 360% turn
  • Hoop Spinning: Balance hoop with top hand and roll it forward
  • Back spin technique Bring hoop backwards to the side
  • Throw the hoop forward, flick wrist to create spin
  • Roll your hoop backwards then try to catch it on your foot
  • Partner Hoops: Roll your hoop with a partner at the same time

At Your Hoop:

  • Compass: Feet in hoop – Move hands around outside of hoop.
  • Around the World – Hands in hoop – Walk feet around outside.
  • Skip around hoop forwards, then backwards.
  • Step through your hoop, when it’s standing.

Musical Hula Hoops

Equipment and Setup: Hula hoops are spread around the floor in random order. The teacher gives direction, then starts the music, student move in the locomotor skill indicated. When the music stops students balance on one foot inside of a hula hoop near them.  Then, the teacher demonstrates different actions to complete at the hoop. When this is complete, the teacher gives a different locomotor skill to move in. The warmup continues in this fashion.

  • Slide Step: click heels in the middle
  • Skipping
  • Jogging
  • Galloping

In and Out Hoops:

Setup and Equipment: Hoops are spread out around around the floor in a random manner. On the teacher signal students follow the directions below one at a

  • Round One: Step into as many different hula hoops as you can. Give them about 30 seconds or so to do this. Then stop the music and ask how many hoops they were able to complete.
  • Round 2: Jump with two feet into as many different hula hoops as you can. Give them about 30 seconds or so to do this. Then stop the music and ask how many hoops they were able to complete.
  • Put both feet in and touch the floor with your hand. Give them about 30 seconds or so to do this. Then stop the music and ask how many hoops they were able to complete.
  • Lift the hula hoop over your hand and back to floor. Give them about 30 seconds or so to do this. Then stop the music and ask how many hoops they were able to complete.

When music stops, stand on one foot and balance. Then follow teacher directions and do the following:

  • Jump side to side ten times – both feet
  • Jump forward and back ten times
  • Jump back on two feet – land on one
  • Jump sideways on two -land on one

Hoop Driving: Setup and Equipment

  • One Hula Hoop for each student.
  • Set cones (at least four) up as the outline for a large track on the floor.

Hoop Driving Guidelines:

Today students will be simulating driving a car by holding their hula hoop in the air as if it were a giant steering wheel.

  • Spread students out around the giant circle which is designated with the four cones.
  • Students will be following the directions of the teacher as they move around the gym in a counterclockwise direction.

Driving Actions: Teacher led demonstration followed by the students practicing the skill as they move around the gym.

  • Car Start and Drive Away Snow: Turn the key or tell Siri to start it: Start your engine! 
  • Grease: RED Light – Stop – Stop your car and wait.
  • You Make Me Feel Like DancingSchool Zone – Skipping happily!
  • You Can’t Stop the Beat: Yellow light – Move slowly 
  • I’m a Gummy Bear: Tunnel –  Walk low to the floor 
  • Don’t Stop: STOP – Stop your car
  • Life Is a Highway: Highway – Move faster, jogging and running
  • Yakety Yak: Oil Slick – It’s very slippery, so be careful. Quick turns 
  • Sirens-Remix (Sound Effect) Highway Police! – Pull over to the right.
  • I’m Walkin’:  Flat Tire – Hop on one
  • Cha-Cha Slide Radio: This song is so good on the radio that you are going to pull your car over and dance inside your hoop.
  • Banana Song (From the Minion Movie): Potholes – leap over the holes
  • Vehicle Reversing Beep: Reverse – Walk backwards
  • Happy: School Zone – Skip backwards in Reverse
  • Stuck in the Mud: Jog in place
  • Interstate: Put your Car on cruise control
  • Rain: Hold your steering wheel with one hand and use the other as a windshield wiper.
  • Radio: The song is so good on the radio that you are going to pull your car over and dance inside your hoop.
  • Sunshine: Reach into the glove compartment to pull out cool shades — put them on using the “John Travolta” fingers in a “V” shape moving over the eyes
  • Muddy Road: Slide in the mud by sliding feet & moving hips

Musical Hula Hoops

Setup and Equipment

  • At least one hula hoop for each student in class.
  • Spread out hula hoops randomly on the floor.
  • Students stand in a hula hoop – Music starts and students begin a loco-motor movement.

Guidelines: Teacher Directed

  • Move outside of the hula hoops and when the music stops, step into the hoops that you are closest too.
  • When music stops, students stand in a hoop and balance on one foot.
  • Locomotor Skills: Skip, gallop, slide-step or grapevine, jogging, power walking

Cinchy Relay: 1/2/3/4/5

 Setup and Equipment

  • 6 Hula hoops and a large cone near the starting line
  • 6 Teams line up in relay style at one end of the gym.
  • Use hoops that correspond to their color teams if possible

Guidelines

  • The teacher rolls 6 hula hoops to the end of the gym at the same time
  • The first teams in each line runs to the other and and pick up one of the hoops and return it by putting it over a large orange cone that is set up in the middle near the starting line
  • Go to end of line after each turn.

Hoop Activity Links:

Hoop D’jour

Arctic Wind Hoops


Print Friendly, PDF & Email

Halloween Tag Games

Pumpkin Tag

Setup and Equipment:

  • Stuffed Halloween character work well instead of yarn balls.
  • Gym mat in front of each wall for a 3 second base.
  • In our gym we randomly choose one team, which is 4-6 people to be taggers

Guidelines:

  • Start up the Halloween music.
  • Taggers can toss or tag by tossing or tagging shoulders or below.
  • If a child is tagged, the child must freeze and sit down on the floor in a pumpkin shape (arm hugging his/her knees to the chest with one fist making a stem on his/her head).
  • In order to become “unfrozen,” any player that is not a “witch” must see the frozen pumpkin, and give their stem a fist bump to free them.

Zombie Tag
Music: Halloween Favorites  with the Simpson’s Halloween Special as transition music.

Setup and Equipment:

  • Stuffed Halloween characters or yarn balls to use as taggers.
  • One mat is set up in front of each wall – these are safe bases

Guidelines:

  • One team of 4-6 students is randomly chosen as “its” – they may throw (shoulders or below) or just tag players.
  • If they are tagged, they are turned into a zombie, they have to find another zombie. Walk like a zombie until you find another zombie, then make a bridge with their hands, then a 3rd zombie will walk under the bridge and all three of them will have “free walk backs to a mat.
  • Play continues for about two minutes while the Halloween music is played.
  • When the music stops, choose a new team of taggers.
Print Friendly, PDF & Email

Football without footballs

Football Warmup: 

Equipment and Setup:

  • Equipment: Sheet of paper for each player. Crumple up a piece of paper into a ball to simulate a football.

Move around the gym

  • Throw and catch with same hand, then opposite hand
  • Tap up with the palm of your hand as many times as you can
  • Tap up with the back of your hand
  • Throw ball up and catch with both hands
  • Run and dodge  like a football player

Partner Warmup and Game

  • One partner is the center, the other is the quarterback
  • Hike the ball and the center goes out for a pass
  • After catching the ball from the quarterback – switch roles

Game Rules

  • Hike the ball – Quarterback throws the ball
  • When partner catches the ball, then try to tag them.
  • When the music stops, switch roles and continue
Print Friendly, PDF & Email

Cooperative Blindfold Activities

Blindfold Obstacle Course

Setup and Equipment:

  • Blindfolds for half of the class.
  • Soft throwing balls (yarn balls)
  • Form partners – one has a blindfold on.
  • Gym is set up with cones, hula hoops, dome cones, etc.
  • The other partner is the body guard.

Guidelines

  • The object of this activity is for the “body guard” to safely navigate their blindfolded partner through the obstacle course only using verbal commands.
  • After a short period of time, switch places so each partner has a turn being blindfolded.

Horsing Around

Setup and Equipment:

  • Blindfolds for half of the class.
  • Form partners: One is the horse, the other is the rider.

Activity

  • Teach your horse how to walk, slow trot, and gallop
  • The partner that wears the blindfold to start is the horse. They hold the middle of the rope in front of them.
  • The partner holds the reins (ends of jump rope) and uses verbal commands to move the horse around the gym
  • Teach the verbal and nonverbal commands:
    1. Use “Whoa” for Stop – Pull back on reins
    2. “Giddy Up” for Go – Loosen and shake reins.
    3. “Left”, “Right”  Tug on that side.
  • After a short time the partners should switch places.

Blindfold Tag

Setup and Equipment:

  • Blindfolds for half of the class.
  • Soft throwing balls (yarn balls).
  • Form partners – one has a blindfold on.
  • One soft throwing ball (yarn ball)for blindfolded partner.
  • The other partner is the body guard.
  • Start the game with balls spread around on the floor, so commands must be given to pick up a ball.

Guidelines

  • The object of the game is for the “body guard” to direct their partner to a ball, get them to pick it up and throw it at another blindfolded player. This can only be done with verbal directions.
  • The “bodyguard” is not able help their partner except with verbal directions. They may not block throws. (For safety reasons, body guards may intervene to prevent player from bumping into each other).
  • Partners switch roles when their player is tagged by a ball.
Print Friendly, PDF & Email

Pickle Tag

Setup and Equipment:

  • One gym mat is set up in front of each wall – these are safe bases
  • 4 people are designated as “its” – they may throw (shoulders or below) or tag players.
  • Yarn balls are generally used in this game.

Rules:

  • The four “its” start the game in the center circle of the gym
  • The rest of the players stand on one of the mats to start the game
  • Players run from one mat to another and try not to get tagged
  • Players may rest on a mat for three seconds and then they must go to a new mat.
  • If they are tagged, they go to the pickle jar (center circle).
  • There are “free walkbacks” when a player is freed from the pickle jar. Players get out of the pickle jar when a player not in the pickle jar – hooks elbows with them and gets them to a mat without getting tagged. As long as the students are connected they can’t be tagged.
  • Play continues for 1:30 -2:00 minutes, or sometimes the length of a song. then new “its” are picked.
  • For all tag games, we play a game song for the duration of one turn, then transition music (i.e. Jeopardy Theme) is used to remind students to pick “new its” for a game.
  • When this song is played the students return  the yarn balls to the container and everyone sits at their gym homes”. The teacher may chose a team of students or just have the students raise their hands in the air if they want to be a new tagger.
  • The transition music is set for about forty seconds.
  • The “new its” go to the center circle to begin a new game.
  • The “old its” go to one of the mats on the floor to begin the next game.
  • After choosing the new taggers, everyone else will begin the game on one of the four mats.
  • One issue that arises when using mats as bases is that some students jump, flop, or just decide to sit on the mats. To eliminate this problem, students that exhibit unsafe behaviors shall be considered tagged and go to the center circle in the gym. This keeps students playing the game and solves the safety issue.

Note: You can shorten up games and allow more turns by ending one of the “game songs” early and jumping to the transition music.

Print Friendly, PDF & Email

Castle Builder

Castle Ball

The object of this game is to throw dodgeballs to knock over opposing team’s castles while simultaneously protecting your own team’s castle from being hit.

  • Separate class into four teams.
  • Divide the gym space into fourths, giving each team a quadrant to defend.
  • Provide each team with six hula hoops and have them create their team castle.
    • Build the castle by placing one hoop flat on the floor. Balance four hoops vertically and lean them toward the center. Secure the four hoops with the sixth hoop horizontally on top.
  • Place soft dodgeballs into the center of the quadrants for teams to collect.
  • The game begins when the music plays!

Agility:  Students will run back and forth in their quadrant keeping their eyes on dodgeballs threatening their castle.

Coordination:  Students will collect dodgeballs and throw them at opposing team’s castles. They will build hand-eye coordination by throwing and catching dodgeballs.

Balance:  Students will take turns being in charge of rebuilding their team’s hula hoop castle. Rebuilding the castle will require patience, balance, and focus before the students switch back to defense mode.

Variations:  You can play Castle Ball with designated offense and defense, assigning who will be throwing and who will be guarding and rebuilding the castle OR allowing all students to play all roles during game play.


Print Friendly, PDF & Email

Jack Frost Tag

Setup and Equipment:

  •  K-2: Four stuffed animal taggers
  •  Four hula hoops for the Heat Meisters (Optional for primary grades)

Guidelines:

  • Students that are chosen as taggers (Jack Frost) may tag or throw the stuffed animal or ball.
  • When a student is tagged they are immediately frozen and they stand perfectly straight up and down
  • Students have one way to avoid being tagged. They can do three very slow jumping jacks to simulate a standing snow angel. After 3 seconds they must continue moving and trying not to be tagged by jack frost.
  • The three “heat meisters” carry a hula hoop which is the defroster for this game.
  • They must put the hoop over and down over the frozen player to defrost them.
  • The game continues for about 2 minutes, then new taggers and “heat meisters” are chosen.


Print Friendly, PDF & Email