Polyspot Basketball for Field Day

Setup and Equipment:

  • Polyspots are lined up in half/circle fashion around all of basketball hoops. Break the class into 4 teams. Put out as many spots as you can. Keep some on hand to throw out later if needed.
  • Set up the spots so that the green and yellow spots are at the taller hoops and harder shots. These spots are worth 20 points each. All other colors are closer and worth 10 points.
  • 20 points for yellow and 20 points for green, 10 points for all other colors.
  • For Grades K/1/2 put the spots up closer to the hoops. Put many spots around the “hopper” hoop in the center.
  • If time is short on this activity, it may work better just to have them count how many spots they can get.

Guidelines:

  • On the start signal, one player from each team will dribble to a spot and try to score a basket.
  • The players may have both feet on the spot, or one foot in back and one foot on the spot. No feet in front of the spot.
  • If the shot is missed, they must dribble back to their relay team and pass to the next player in line.
  • If the shot is made, the player should pick up that spot and dribble the ball in one hand and carry the spot in the other hand back to their relay team. Pass the ball to the next player in line and go to the end of the line.
  • A maximum of one polyspot per turn.
  • Each team will start a pile of spots and try to accumulate the most points.
  • Remind players that they must dribble to and from the polyspots.
  • At the end of the game, teams may count up their points.

The Most Fun Wins!

Torch Relay for Field Day

Setup and Equipment

Sixteen golf tubes, four tennis balls, various cones, stepping stones, and hula hoops, etc.

  • Four Teams lined up behind their color team cones.
  • Line up some obstacles: cones, stepping stones and hula hoops and other items that you have in a line in front of each team’s starting cone. At the opposite end of the starting cones place a second cone for half of the team.
  • This a shuttle relay, so half of each of the four teams start at opposite ends (more turns this way).
  • The first two people in each line have a torch (golf tube) to start.

 Guidelines:

  • On the signal the first person on each team moves through the obstacle course while holding their torch (golf tube) with one hand while balancing the ball on top. Two hands can be used for the younger students.
  • If they drop the ball off of the golf tube, simply pick it up and return moving across the course.
  • If someone knocks over an obstacle, they must stop and fix it before moving on their way.
  • Once they reach the other side, they pass the ball to the first person in the line and hand the golf tube to the next person in line and go to the end of the line.

 Object of the Game: How many turns can each person get? How many turns can your team get in 5 minutes?

Additional Options: Balance other types of balls or other items.

  • Can you balance the golf tube on the palm of your hand and move?
  • Can you carry two golf tubes?
  • Additional balance items also available.
  • For some of the older grades, you could also dribble a basketball, or kick a soccer ball around the obstacle course.

The Most Fun Wins!


Pass the Ball Relays

Setup and Equipment: 

  • Four Playground Balls: Red, blue, yellow, green
  • Four Medicine Balls
  • Four other balls of different shapes and sizes.
  • Two long ropes to lay down at one end for the finish line.

Guidelines: Teams line up behind the cone of their color team for directions

Round One: Over Under Relay

The object is to be the first team to cross the finish line.

  • Teams members line up in a line facing the finish line. Put a little space between them each other, so they can pass a ball behind each other down the line.
  • The first person on each team raises the ball above their head.
  • Leader says, “Go”
  • The starting person on each team passes the ball between their legs, the person behind then raises the ball above their head and the over/under pattern continues until the last person gets it.
  • When the ball gets to the last person in the line, that person runs all the way back up to the front, which will move the line forward. The pattern of over/under passing continues until all of the teams cross the finish line at the opposite end.
  • Or you can see how many turns they can get in 3 minutes.
  • The Most Fun Wins!

Round Two: Boulder Passing (medicine ball)

  • Teams stand in a line next to each other. Leave enough room for side to side passing:
  • The ball again starts in the front, but this time the ball will be pass from side to side.
  • When the ball gets to the last person in the line, that person runs all the way back up to the front, where the pattern of over/under passing continues until all of the teams cross the finish line.

Round Three: Hot Potato Passing

  • Teams stand in a line facing the front. Leave enough room to turn around and pass the hot potato!
  • The ball again starts in the front, as soon as you are handed the ball quickly turn around and hand off the hot potato to the person in back of you.
  • When the ball gets to the last person in the line, they run all the way back up to the front, with the ball barely touching their hands. 
  •  When all of the teams have crossed the finish line, the activity is over.

Round Four: Ball Toss Relay

  • Line up the four teams from the starting line to the finish line. Space the teams out so they have to toss the ball between them.
  • At the signal each team begins throwing and catching the ball to see which team can have their ball pass the line first.

Other Ideas 

  • Mix up the teams
  • Use other size balls

Coffee Sack Relays

Setup and Equipment

  • 4 coffee sacks
  • 4 cones: red, blue, yellow, green
  • 2 polyspots: red, blue, yellow, green
  • Teams line up behind the polyspot in relay style facing their cone.  The cones for each team are placed 10 to 15 feet away from across the starting polyspot
  • Change the length if it’s too long or too short after each group

Round One: Individual Coffee Sack Hop

  • One sack for each team
  • 1st player on each team puts both feet in the sack and hold the top of the sack.
  • “Go” Jump until they get to the cone, then go around the cone and give the sack to the next player
  • Give a high five to the 1st person on that team, who begins jumping to the other side.
  • Hand off the sack to the next person in line, then go to the end of the line.
  • When everyone on the team has returned to their starting positions, they should sit down.

Round Two: Individual Coffee Sack:  (A. Sideways B. Backwards) You May Want to do this is separate events.

  • Stand with both feet inside, but try to move sideways first turn and backwards on your second turn.
  • “Go” Students move until they get to the line on the other side.
  • Give a high five to the next person in line, who begins moving to the other side.
  • Hand off the sack to the next person in line, then go to the end of the line.
  • When everyone on the team has returned to their starting position a second time, they should sit down.

Round Three: 3-legged race

  • One sack for each team
  • 1st and 2nd person on each team are partners
  • Stand next to each other and pull a sack up on the legs that are next to each other. This is the third leg.
  • “Go” Move until they get to the cone and make a turn around the cone and back to the start. 
  • Give a high five to the next two people on that team, who begin moving to the other side in the same manner.
  • Hand off the sack to the next two people in line, then they go to the end of the line.
  • When everyone on the team has returned to their starting positions, they should sit down.

Variations: Can you do a four legged race, a five legged race?

 The Most Fun Wins!


4th/5th Game: Scooter Basketball

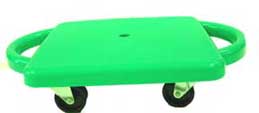
Scooter_green-PE

Equipment and Setup:

  • To start the game, pick two teams and they line up facing each other along the line at each end of the gym.
  • Each team should wear a vest to identity which team they are on.
  • Line up so that each team has about the same number of players and they are evenly spaced out.  Note: If you don’t have written numbers on the floor, you can use polyspots
  • Put a container in front of each end wall (A large trash barrel works fine). I usually put it on a gym mat, so players aren’t able to roll right next to the goal.

Guidelines:

  • Two or three players from each team go to the middle on scooters. Note: The players who remain in line do not have scooters.
  • The games starts by the teacher giving a ball to the last player on one of the teams. Player pass the ball down from one player to another until it reaches the side of the gym where their basket is.
  • After everyone in the class has had a turn on the scooters, you can change the number of players. Adding one player after each round to a maximum of five works well.
  • Players on scooters who are in the defensive position may only put their hands straight up into the air (not reach for the ball).
  • If after two to three minutes there is no winner, the teacher can can count backwards from ten to one for an exciting finishl
  • If a player handling the ball falls off of the scooter, the ball goes to the other team.
  • The scooter players may not dribble, only pass or score.
  • Sideline players are important in this game. They cannot score, but contribute to the game by passing the ball. Remind the players that the ball is impossible to intercept if it is passed down their own line.
  • Players on scooters will need to be reminded to pass to their teammates on the sides.
  • You may keep score … and/or THE MOST FUN WINS!

Water Balloon Toss for Field Day

Setup and Equipment:

  • Small round balloons. At minimum, you could fill one balloon for every two students.
  • When we have  eight classes, fill up at lead twenty balloons for each class. That about 160 balloons. You can double that number if they break easily.
  • Fill balloons so that they would be easy to throw and catch fit in the palm of one hand.
  • Fill the balloons ahead of the event and store in pails or laundry baskets.

Guidelines:

  • Make two lines: One line is the stationary line and one is the rotating line. Do these lines for third grades and above.
  • Line up red and blue teams next to each other in one line.
  • Line up yellow and green in another line facing the other line about shoulder width apart.
  • The person across from you will be your partner. Adjust the lines, so that everyone has a partner.
  • Walk down the line and hand one water balloon to everyone in one of the lines.
  • Do not throw the balloon until the signal from the leader.
  • When the leader gives the signal, throw the water balloon forward and back.
  • Take a step back and toss the water balloon again, forward and back.
  • Wait for the leader to signal when it is time to move back one step.
  • Then, wait for the leader’s signal before throwing the next water balloon.
  • Continue as long as you can!
  • For the older kids add having the rotating line move down one person after each toss.
  • The person at the end, then runs to the beginning and has a new partner to toss to.

      The Most Fun Is Still Winning!


Scooters

Scooters

  • Scooters are not skateboards, no standing on them. Start moving when you are on your scooter (Never run and jump on your scooter).
  • Get on your scooter and move in one of the six ways listed below.Set this up in your gym by putting half of your class spread out on the line at one end of the gym and the other half on the opposite end. Students will practice moving using all of the following methods. It’s important that students know that these are the only safe ways to move on your scooters. It also helps to have students make the effort to avoid collisions at the center of the gym.
  • The students follow the directions for each of the following movements by moving to the opposite end of the gym on the teacher’s signal, turning around and waiting for the next direction.
  1. Walk Forward: Pull forward with feet only – Hands on side handles
  2. Walk Backward: Push backward with feet only -hands on handles, turn head around slighltly to see behind you
  3. Arm Pull Forward: Lie on scooter and balance, use hands only to pull your body forward.
  4. Alligator: Lie on scooter – Use hands and feet
  5. Double Knee Coast: Both knees on scooters –
  6. Use hands to pull yourself forward
  7. One Knee On: Use the foot on the floor to propel yourself forward, while both hands hold onto the side handles.

Musical Scooters Warmup Activity

  • Students move in one of the modes from above.
  • When the music stops, spin yourself by using your hands only
  • Variation: Do a dead bug, by flipping on to your back, holding the scooter in the air and shaking your scooter and legs in the air.

Indy 500:

Setup and Equipment

  • Six color teams and six scooters
  • Set color team cones in a large track formation near the center of the gym to make a race track. Set the cones up so that there is one at each of the short end of the track and two on each of the long sides (straightaways) of the track.
  • Line up each team beside the cone of their team facing in a clockwise directions.

Guidelines for Indy 500

  • This will be a race around the outside of the cones. You’ll be lining up like it’s a 400 meter relay on the track.
  • Break into pairs by your team’s cone. The partner can only push when traveling around the curves. The driver has to  glide or make themselves move on the straightaways.
  • When you get back to your starting part, change places or let your other partners take a turn. Continue taking turns moving around the track.
  • How many laps can your team do in five, or maybe 10 minutes?

Glide Control

  • Two partners from each team line up at the black line in the front of the gym. One is standing, the other is sitting on the scooter.
  •  On the teacher’s signal, the person in back leans down low and pushes their scooter partner towards the climbing wall;
  • When they hit the wall or calmly stop before hitting the wall, pick up the scooter and run it back to the front of the line
  • The scooter is handed off to the next people in line and they now go to the end of the line.

Scooter Games:

Scooter Freeze Tag

Scooter Basketball

Partner Ball Relays

Setup and Equipment:

  • 4 red, blue, yellow, and green cones.
  • The red cone faces the blue cone about 10 – 15 feet apart. The yellow and green teams line up next to the red and blue teams. The red and blue teams will form partners with each other. The yellow and green team will form partners with each other.
  • 2 playground balls and some alternative balls for primary grades.

Guidelines:

  • Teams line up behind the red, blue, yellow and green cones
  • One ball starts with the red team and the other ball starts with the yellow team.
  • The first two people on the red and yellow teams step up.
  • Round One: Partners are given one ball, which they move the ball by balancing it between their backs as they move to the opposite side.

○     Now the next two people in line on the opposite side get ready to receive the ball.

○     Continue to move the ball until everyone has completed a turn.

  • Round Two: Balance the ball between your shoulders.
  • Round Three: Balance the ball between your hips
  • Round Three: Balance the ball between your stomachs.

Challenge: Can you pass the ball off from one set of partners to the other?