Tchoukball (Chookball) Relay

Tchoukball Relay

Setup and Equipment

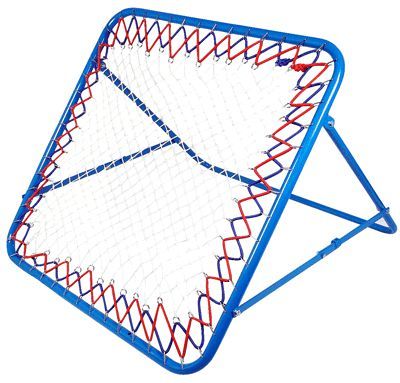
  • Four Tchoukball (Chookball) Frames 
  • Four balls: Playground Balls (any kind will work)
  • Four Cones red, blue, yellow, and green cones lined up facing the goal
  • Make 3 lines on the blacktop about 5 feet in front of the goals. Make a second line about 10 feet back and the third 15 – 20 feet back. Use sidewalk chalk, poly spots or jump ropes.

Guidelines:

  • Teams are lined up facing the goals. This is a relay.  If the ball is thrown directly in the center the ball it should bounce into the air and you should try to catch it on a fly. You also get points if you catch it on one bounce.
  • The first person on each team will move the ball by running to the first, second or third lines and throw the ball at the net.  More points are earned by attempting the longer throws.

Round 1: 

  • The first person on each team will move the ball by running to the first line or spot near the goal and attempt to throw the ball at the center of the goal.
  • If the ball is thrown directly in the center the ball it should bounce into the air and you should try to catch it on a fly. You also get points if you catch it on one bounce.
  • You earn 1 point for throwing and catching it on a fly and from the first line.
  • You earn 2 points by throwing and catching it from the second line on a fly and one point if you catch it on a bounce.
  • If you throw and catch it on a fly from the three-point line you get three points. If you catch it on a bounce you get 2 points.
  • Continue for five minutes and see how many points your team can get.

Round 2: Partner

  • The first two people on each team will move the ball by running to one of the lines. One person is the thrower and one is the catcher.
  • Use the same point system as above.
    Continue for five minutes and see how many points your team can score.

Round 3: Partner Variation 

  • One partner runs up and throws the ball and the other partner tries to catch it. On each turn switch the roles of throwing and catching.

Younger Grades: For the younger grades you won’t need to do the points. They’ll just enjoy seeing how far they can bounce the ball.
Variations: Round Three: Try different balls. How about basketballs, soccer balls?

The Most Fun Wins! 

Print Friendly, PDF & Email

What is PEDL? (PE for Diverse Learners)

This course is designed to introduce prospective teachers to lessons, activities and games that reflect changes in the emphasis of the P. E. Curriculum. At its core, this is essentially a move away from sports-only skills and a move toward the much more inclusive concept of lifetime fitness.

Frank James, the instructor of this course, is a veteran Elementary School teacher with 31 years of experience teaching in Grades K-6. The first twenty years of teaching were in the classroom and the last eleven were as a P.E. teacher. So, students taking this course will find many practical ideas for the classroom, in addition to the teaching and management of activities and games in the gym.

What You Will Learn from this Class?

This course will allow UO students the opportunity to learn P.E. activities in the course during the Friday class, then see those same lessons and activities as they are taught with elementary age students during practicum opportunities. Along with the knowledge of how to teach elementary students in the gym, these classroom management ideas may also be applied to the classroom setting.

The number one problem in the classrooms is not discipline: it is lack of authentic learning tasks, procedures, and routines”.  Harry Wong Former National Teacher of the Year.

Procedures and routines are utilized in our P.E. classes by designating a  gym home for each student. The gym home is essentially like a classroom desk where a child begins and ends their day.  The Edison gym is set up to visually facilitate classroom management through walls that are painted with the four primary colors and color coded squares on the floor that are the  ”gym homes”. for each student. The floor is designed by spacing out squares in six lines, with each line a different color team. Once they know where their gym home is all the teacher has to do is say the words, “gym home” and students know exactly where to go. The color teams allow for the teacher to quickly break the class in half or assign each color team to a station (when there are six stations). Creating this kind of predictable environment empowers students and leads to better learning outcomes.

82 % of teaching communication is nonverbal   Patrick Miller NEA Research 

With the level of excitement and the amount of movement in the gym, it is essential for the teacher to have some nonverbal cues to immediately move students. Traditionally, blowing a whistle or raising your voice is used to get the attention of the class.  In this class you will learn how to use music as a major component of classroom management in the gym. The teacher introduces what the students will be expected to do whenever they hear a certain the song. The students may need to practice or role play the particular skill. For example, when it is time to pick new “its” for a game, the music changes to a different song (I find that popular movie themes work well).  Once the students know the cue, the transition is often completed without verbal directions from the teacher. Whenever a teacher is able to utilize nonverbal cues to manage behavior, their voice is saved for teaching.

Print Friendly, PDF & Email

Bear Sighting Freeze Tag

Setup and Equipment:

  • Everybody It Version: No equipment needed

Guidelines:

  • Students are tagged with a two finger (peace sign) tag on someone’s knees.
  • If someone is tagged in this game; make themselves as big as they can by spreading legs and stretching out hands.These are  the protocols for a bear sighting in the woods near Spencer Butte. Remain standing in this frozen position until saved by a classmate.
  • To be saved from a frozen state, classmates will give them a high five to get back in the game.
  • Students have one way to avoid being tagged.  They are safe in in this game when they are pivoting on one foot. Students may do this for three turns, then they can move again.
  • Game changer: No bases. For 30 seconds there is no pivoting.
  • The game continues for about about five minutes or so.
  • Variation: Choose taggers who can use yarn balls as taggers.


Print Friendly, PDF & Email

Pajaggle

PajagglePajaggle Stacks 

Hold up a Pajaggle (large foam puzzle piece) and show the students that the outside piece is the ring. The inside piece is the insert. If there is a smaller insert, this is called a mini insert.Note: Use your hand when removing an insert from a ring

Activity: Team Pajaggle

Distribute a class set of Pajaggles (Large foam puzzle pieces with inserts) equally  to each of the six teams lined up in relay style. If your largest team is six players, then all teams will take six pajaggles. 

  • The object of the game is for your team to fill up all of your team’s pajaggle rings. Then see how fast the whole class can complete filling all of the rings for all of the teams.
  • Lay the six pajaggles next to your relay team.
  • Pull out the inserts and everyone walk to the center line, close your eyes and fling the insert as far as you can. 
  • Teams go back to their relay team.
  • On the teacher’s signal, the first person on each team runs to the inserts at the opposite end of the gym.
  • Pick up one insert and return to your relay team. Give the next person on your team a high five they continue looking for inserts that fit your rings.
  • If the insert fits, then you keep it. If the insert does not fit, hand it to the next person on your team, who will fling it after they get a high five for their turn.
  • They run back to their line and give a high five to the next person in line.
  • Continue until all of the pajaggle puzzles are solved.
  • How long does it take the whole class to get all of their puzzles solved?

Game: Chasers and Puzzlers (This event is timed)
Setup and Equipment

  • The class is divided in half.
  • One half of the class are the chasers and the other half is the puzzlers.
  • The puzzlers sit around the center circle in the gym.
  • The pajaggles are set up at one end of the gym with the inserts taken out.
  • The chasers line up their relay teams, so they can easily pass beside the puzzlers in the center of the gym.
  • On teacher’s signal, the chasers run one at a time to pick up one piece at a time and hand it off to the puzzlers.
  • The puzzlers will begin to put the pajaggles together in one giant puzzle.
  • Chasers continue running until all of the pieces are in the center of the gym.
  • Puzzlers continue until the giant puzzle is put together.
  • The teacher stops the time when everyone is sitting down and the puzzle is completed.

Links to Pajaggle Games:


Print Friendly, PDF & Email

2017 Physical Literacy Practicum with Bev Smith

Students in EDST 440 who are able to to participate in this may waive all of required practicum assignments participating by participating in this.

KIDSPORTS/Cesar Chavez Physical Literacy Project 2017

KIDSPORTS is partnering with Cesar Chavez to bring the Physical Literacy Project (PLP) to elementary aged children attending Chavez Elementary in Winter Term of 2017.

  • Children will learn movement and motor skills through fun, games, and activities that provide opportunities for children to learn to move their bodies with confidence and under control.
  • KIDSPORTS is very interested and excited about partnering with students in the Oregon College of Education to provide undergrad students with practical field experience in the Eugene/Springfield Community. As a future teacher, this experience allows you to be a part of a cutting edge Physical Literacy Program that would give you experience in physical education curriculum and program execution. Volunteer Expectations/Commitment: Students will be asked to volunteer at one of two sessions per week, or if desired, both sessions.
  • Students will work with a qualified instructor and will have access to the KS Physical Literacy Curriculum.
  • KS/Cesar Chavez Physical Literacy Project starts right after school each Monday and Thursday at 2:15 pm until 3:30 pm starting on Monday, February 6th and ending on Monday , March 6th.
  • The program runs for 4 weeks and offers 8 physical literacy sessions. (No session will be held on President’s Day Monday, Feb. 20th , 2017) The KS Cesar Chavez PLP is open to all children 1st to 5th grade enrolled at Cesar Chavez Elementary School.
  • (The class has a maximum capacity for 25 children) Cesar Chavez is located at 1510 W 14th Ave, Eugene, OR 97402 For further information, please contact Bev Smith, Executive Director of KIDSPORTS at: bevs@kidsports.org or by calling 541-683- 2374 ext. 109
Print Friendly, PDF & Email

PEDL Alternative Assignments

EDST 440  PEDL Alternative Assignments

To make up for missing points. Here are some professional articles in .pdf that you can read, summarize, and enter into Canvas for assignments or practicums that you were unable to complete.

keep-an-eye-on-the-hand  This article is the based on how nonverbal communication is used by classroom teachers. Write about what you’ve learned from reading it, you can also include anything that you’ve learned in class. Can you see yourself using these skills?

Mindfulness in Elementary Schools This article explains the benefits and practical application of mindfulness in elementary school. Can you see how mindfulness could benefit you students? If you had the support of your school, can you see yourself using mindfulness in your classroom?

yoga-in-public-schools Yoga offers a potential means to address a wide range of challenges in the public school classroom. Write about some of the benefits of yoga in the classroom. Can you see yourself introducing some form of yoga in your own classroom?

Print Friendly, PDF & Email

Ball Relays for Field Day

Setup and Equipment:

  • Four Playground Balls
  • Four Medicine Balls
  • Set of four balls of different shapes and sizes.
  • Four cones and four polyspots
  • Golf tubes and tennis balls

Guidelines: Teams line up behind the cone of their color team for directions

Round One: Over Under Relay

  • The object is to be the first team to cross the finish line.
  • Teams members line up in a line facing the finish line. Put a little space between them each other, so they can pass a ball behind each other down the line.
  • The first person on each team raises the ball above their head.
  • Leader says, “Go”
  • The starting person on each team passes the ball between their legs, the person behind then raises the ball above their head and the over/under pattern continues until the last person gets it.
  • When the ball gets to the last person in the line, that person runs all the way back up to the front, which will move the line forward. The pattern of over/under passing continues until all of the teams cross the finish line at the opposite end.
  • Or you can see how many turns they can get in 3 minutes.

The Most Fun Wins!
Round Two: Boulder Passing (medicine ball)

  • Teams stand in a line next to each other.
  • Leave enough room for side to side passing:
    The ball again starts in the front, but this time the ball will be pass from side to side.
  • When the ball gets to the last person in the line, that person runs all the way back up to the front, where the pattern of side to side passing continues until all of the teams cross the finish line.

Running Relay

  • Break the four teams in half and line up one half  in front of the starting spots and the other half behind the cones about 15 – 20 yards away.
  • Each team has their color team playground ball.

Guidelines:

  • The first person on each team has a ball. On the signal the first person on each team runs to the opposite end carrying the ball, then hands it to the next person in line, then goes to the end of the line.
  • Continue until everyone is back to the starting position.
  • Most fun wins!


Partner Ball Relays:

  • Break the four teams in half and line up one half  in front of the starting spots and the other half behind the cones about 15 – 20 yards away.
  • The first two people on each team step stand behind their spots at one end, facing the rest of their team, standing behind the cone at the other end. If there is an odd number of people, teams may try to use three people to move the ball, or someone can volunteer to have a second turn

Round One: Shoulders

  • Partners are given one ball, which they move the ball by balancing it between each other’s shoulder as they walk to the opposite end. 
  • Try to make a pass without dropping the ball. Go to the end of the line after each turn.
  • Continue until everyone is back to the starting position.
  • Round Two: Balance the ball between your shoulders.
  • Round Three: Balance the ball between your hips
  • Round Three: Balance the ball between backs, posteriors?!

Torch Relay: Carry and pass tennis balls with golf tubes.


Print Friendly, PDF & Email

Scooters in the Gym

Setup and Equipment

  • Six to Eight Scooters
  • Set small cones in a large circle near the center of the gym to make a race track.
  • Line up each team at each of the sides of the ‘circular “track”

Guidelines for Indy 500

  • This will be a race around the outside of the cones. You’ll be lining up like it’s a 400 meter relay on the track.
  • Break into pairs by your team’s cone. The partner can only push when traveling around the curves. The driver has to  glide or make themselves move on the straightaways.
  • When you get back to your starting part, change places or let your other partners take a turn. Continue taking turns moving around the track.
  • How many laps can your team do in five, or maybe 10 minutes?

Glide Control

  • Two partners from each team line up at the black line in the front of the gym. One is standing, the other is sitting on the scooter.
  •  On the teacher’s signal, the person in back leans down low and pushes their scooter partner towards the climbing wall;
  • When they hit the wall or calmly stop before hitting the wall, pick up the scooter and run it back to the front of the line
  • The scooter is handed off to the next people in line and they now go to the end of the line.

Parachute and Scooters

Setup and Equipment:

  • Six to eight of the three wheeled scooters.
  • If there are eight scooters, then each of the four teams will have two scooters.
  • Spread out around the parachute and do the merry-go-round by having everyone turn and skip in one direction. Then,stop and go in the opposite direction.
  • Six to eight people start moving under the parachute in the same directions as the parachute is moving.
  • Practice moving the parachute up and down.
    Choose six people to get a scooter and go under the parachute and begin moving around.
  • Whenever the parachute changes direction, the scooters should also change direction. Start walking or skipping, then change directions and moving the parachute up and down.
  • Whenever the parachute stops, the scooters can spin around or move any direction they want to.
  • After a couple of minutes change places, so everyone gets a turn under the parachute.
Print Friendly, PDF & Email

Scooters, Parachute in the Gym

Setup and Equipment:

  • Six to Eight Scooters
  • Set small cones in a large circle near the center of the gym to make a race track.
  • Line up each team at each of the sides of the ‘circular “track”

Guidelines for Indy 500

  • This will be a race around the outside of the cones. You’ll be lining up like it’s a 400 meter relay on the track.
  • Break into pairs by your team’s cone. The partner can only push when traveling around the curves. The driver has to  glide or make themselves move on the straightaways.
  • Whe you get back to your starting part, change places or let your other partners take a turn. Continue taking turns moving around the track.
  • How many laps can your team do in five, or maybe 10 minutes?

Glide Control

  • Two partners from each team line up at the black line in the front of the gym. One is standing, the other is sitting on the scooter.
  •  On the teacher’s signal, the person in back leans down low and pushes their scooter partner towards the climbing wall;
  • When they hit the wall or calmly stop before hitting the wall, pick up the scooter and run it back to the front of the line
  • The scooter is handed off to the next people in line and they now go to the end of the line.

Parachute and Scooter Activity

  • Spread out around the parachute and do the merry-go-round by having everyone turn and skip in one direction.
  • Choose one group to get a scooter and go under the parachute.
  • Parachute Commands
    • Shoetops
    • Raise the chute up as high as you can.
    • Snap Bring the chute down as fast as you can.
  • All scooters should be out by the count of three.
  • Continue taking turns by calling different color teams: red,blue, yellow and green.
  • Whenever the parachute changes direction, the scooters should also change direction. Start walking or skipping, then change directions and moving the parachute up and down.
  • Whenever the parachute stops, the scooters can spin around or move any direction they want to.
  • After a couple of minutes change places, so everyone gets a turn under the parachute.


Print Friendly, PDF & Email