Field Day Supply List

Tug of War 

  • One Tug of War rope that has four ropes that are red, blue, yellow and green.
  • Cones are set up around in a 4 foot square with one cone in the center.
  • Each color team lines up and holds their color team’s rope.

Potato Sack Relays

  • 4 Potato sacks
  • 4 cones: red, blue, yellow, green
  • Red cone is  10-15 feet across from yellow – that’s one team
  • Blue Cone is 10-15 feet across from green – that’s the other team
  • Line up relay style behind the cones. (Shorter distance to start (10-15 feet)

Pass the Ball: Team Relays

  • One red, blue, yellow, and green cone. Balls: Playground, Medicine, Other shapes and sizes
  • Teams line up behind the cone of their color team for directions

Tkouchball Bounce

  • Four balls: Playground Balls (any kind will work)
  • Two to Four Tchoukball Goals
  • Four Cones or Polyspots that match our red, blue, yellow, and green teams. Line up behind your color facing the goals.

Fill the Bucket

  • Four Cones for red, blue, yellow, green teams.
  • Water faucet and hose near this station.
  • Large container for holding water to dip from.
  • Four Pails for filling
  • Cups for dipping and passing the water.
  • Line up behind cones that match color team

Water Balloon Toss

  • Water balloons filled with water. The smaller size works fine. Fill and store in laundry baskets.
Print Friendly, PDF & Email

EDST 0602 Field Day

The Hello and Goodbye Field Day 
Thursday, June 2nd at 4:00
Edison Elementary School  1328 E. 22nd Ave.

U of O students enter in back of the school, at the gate off of Emerald Street side. We will meet in the gym.

Each student will check in and be given a sticker that will designate where they’ll start for our field day.

A “hello” warmup activity will start the celebration, then we’ll break into groups and begin the stations.

Each station lasts for fifteen minutes. Music will play for each station, a transition song will play when it is time to transition to the next station. Each group moves up to the next highest number until you get to six. After station six, teams will go to station number one.

* Those students who are assisting with running the activity should arrive 45 minutes early.

Field Day Links

  1. Fill the Bucket
  2. Water Balloon Toss
  3. 4-Way Tug of War
  4. Pass the Ball Relays Partner Ball Relays
  5. Tkouchball Bounce
  6. Scooters: Indy 500  Scooters and Parachute


Additional Activities:

Parachute Activities for Field Day

Coffee Sack Relays


Print Friendly, PDF & Email

Peer Teaching EDST 440

PEER Teaching in the Gym

 A Successful Activity in the gym: has most students engaged and their mood is lifted by music, physical activity, and positive relationships with their classmates.

Gym Homes and Color Teams:

Since we have the gym homes set up for this class, this is generally the best place to have your students sit for instructions. When you are teaching or even student teaching, you would be wise to create gym homes and color teams for them. If you go to this much trouble, you might also consider organizing your classroom with the same format. I do balance the color teams with an equal number of boys and girls on each team,

Music:

Music has the ability to change the mood of a class. It is also a great way to nonverbally signal when an activity begins or ends. It has untapped potential in assisting with management in the classroom too. When you want students to put everything away and be ready for transition, use a 30 second song. Then the song is running your class and not the teacher. Also, it’s a good stress manager for the teacher if you like the music too!

Tag Games:

Make sure all tag games have a way for students to get back in the game after the tag. This is essential for creating a fun atmosphere, because students aren’t just getting each other out, they are getting them back in the game. Partner tag games may have the highest level of participation and many require no equipment. Also, if you have old stuffed animals, they make for very popular taggers.

Here’s the color scheme that we use in the gym, It is also used by the major P.E. suppliers, so you can often have equipment that is the same color as the teams, which makes for much easier transitions.

Blue

Orange

Yellow

Green

Purple

Red

 When You’re teaching: Connecting to previous experiences improves the pace of understanding:

When teaching in the gym it is helpful to connect a new activity to a previous one. It makes for quicker understanding. For example you might say, “You remember when we held a parachute in a circle in the center of the gym. Let’s make a circle about the same size”.

When teaching university students, we also have many common experiences during the term, so when you are peer teaching it will lead to quicker understanding if you can refer to a previous game or activity that has some similar attributes. This is one reason why student teaching is more difficult than your first year of teaching (though obviously much shorter). When you are student teaching you do not have the common learning experiences that the regular teacher has with the class. So it’s hard to overcome student comments like, “That’s not how the teacher does this”. When you have your own classroom you are connected to everything that happens and you will be better able to build off of previous learning.

Demonstration:

When you’re teaching in the gym it often helps to have a small group of students do a demonstration. It is amazing how seeing (nonverbally) the activity in action improves the understanding of the activity or game. If it’s a tag game you should visually demonstrate the two-finger peace tag on the back of a classmate. For additional reinforcement you may want to have everyone in class show the teacher how you tag people.

Classroom and P.E. Nonverbals:

If you find yourself repeated a verbal directive, look for a way to change it to a nonverbal. If you excuse students from class by saying the name of a group, just write the name on a piece of tag paper and hold it up instead. In our gym we put the color team names on the wall and use a laser pointer to point and excuse them. It’s quieter and kids respond more quickly to visual information and something that is unique, like a laser pointer.

Print Friendly, PDF & Email

Hoop Passing for Small Groups

Equipment and Setup:

  • Student arranged in groups of five to eight.
  • Hula Hoops: Two per group
  • Group holds hands in a circle facing each other

Guidelines:

  • Each group hangs one of the hula hoops on a pair of linked hands in the group. The other hoop is set on the floor outside of the circle.
  • The object of this is activity is to see how quickly and gracefully the hoop can be moved around the circle back to the starting point without letting go of your hands. Bending, twisting and talking to each other will be a big help.
  •  The most popular way to pass the hoop is by stepping into and ducking through the hoop, while lifting the hoop up and down and using gravity to slide the hoop.
  • Once a group can pass one hoop around the circle add a second hoop and continue.
  • How many times can you get the two hoops passed around your circle in two minutes or the time of one song.

Other Ideas:

Reverse: Play music to start passing the hoop. When you hear the sound of a truck backing up change the direction that you are passing.

Magic Passing

  • Start two hoops facing each other on opposite sides of the circle. Use “magic” or change the shape of your hoop to get them to pass through each other until they reach the starting point.

Caterpillar Line Race

Equipment and Setup:

  • Six groups of students line up at one end of the gym
  • Hula Hoops: Two per group
  • Group holds hands in a line standing next to each other.
  • Two hoops are on the floor next to the end line of the last person in line.

Guidelines:

  • The object of this activity is to get your group to the opposite end of the gym.
  • The hoops are passed backwards towards the starting line. When the hoop gets over the last person in line, they run to the front of the line toward the end line at the destination.
  • Continue passing the hoops backward and moving the line forward until you reach the destination.


Print Friendly, PDF & Email

Hoop Driving

Equipment and Setup:

  • One hula hoop for each student in the class.
  • Set up cones near each corner of the gym with enough room for the students to easily pass around the outside of the cone.
  • Music for Driving

Guidelines:

Today students will be simulating driving a car by holding their hula hoop in the air as if it were a giant steering wheel.

  • Spread students out around the giant circle which is designated with the four cones.
  • Students will be following the directions of the teacher as they move around the gym in a counterclockwise direction.

Driving Actions: Teacher led demonstration followed by the students practicing the skill as they move around the gym.

  • Song 1.  Sound Effects  Start Your Engines: Turn on your car.
  • Song 2.  I’m Walkin’  Yellow light:  Move slowly with caution
  • Song 3.  Stop in the Name Red Light: Stop and Freeze
  • Song 4.  School Day  School Zone: Students are always happy as they go to school. Let’s see those happy children going to school.
  • Song 5.  Greased Lightning Highway: Speed limit is now 70 mph, not 20 mph like in the school zone. So, get moving!
  • Song 6. Rock Around Uphill: Lift your knees up high as you march up the hill.
  • Song 7. At the Hop  Flat tire – Hop on one foot until you are so tired you have to pull over. You may stand on one foot and balance as you await assistance.
  • Song 7. Grease Tunnel: Bend your knees and drive.
  • Song 8.  Sound effects Emergency vehicle: Pull over to the right side as the siren sounds.

Two Directions at the same time!

  • Song 9 . Happy Yellow Light and School Zone –Slowly Skip in a School Zone
  • Song 10. Sound effects Uphill and in Reverse March backwards
  • Song 11.  Afro Nuts Reverse and School Zone Skip Backward in the school zone
Print Friendly, PDF & Email

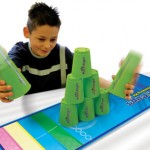
Cup Stacking: Sport Stacking

Cup Stacking

For a free set of  Speedstacks and a DVD: Go to their teacher web site and fill out their online information. Click the Cup stacking picture (above), or the following link:

Speed Stacks Teacher Central

Basic Stacking Information

  • Introduction: The first day of cup-stacking is a DVD or smart board video if your students have not been previously  introduced. The DVD, videos  and other Sport-stacking items are available at the Speedstacks website. There are also many videos on  You Tube.

Teach Stacking in order of difficulty:

  • 3-3 Stack
  • 3-3-3 Stack
  • 6 Stack
  • 1-10-1 Stack

Six Stack -up stack

  • Start with 6 cups in front of you
  • Take 3 cups with your right and 2 cups with your left
  • Leave one cup down
  • Spread the cups apart with your fingers
  • Release the bottom cup of your right hand to the right of the center cup so you now have 2 cups left in that hand
  • Release the bottom cup with your left hand to the left of the center cup
  • Release the next cup from your right hand on top of the center
  • Set the cup on in the left hand next to it
  • Put the final cup on on top with right hand

6 Stack -Down stack

  • Place right hand on top cup and your left hand on the second cup on the left
  • Slide to the right with your right hand, at the same time slide left with your left hand
  • Take the 3 cups in your left hand and the 2 cups in your right hand and put them in one stack of 6 cups

Partner Challenge:

  • Sets of cups are needed for each students.
  • Students sit in pairs across from each other.
  • Teacher designates a stacking formation:
  • 3-3-3-3
  • 3-6-3
  • 1-10-1
  • Start in down-stack position.
  • Stand up when up-stacking and down-stacking are complete.
  • Teacher gives the accumulated time count after the first person is standing.

Around the Table

  • (Set up tables so four people to six people are able to stack at the same time)
  • Students stand behind a table in front of down-stacked cups.
  • Teacher designates a stacking formation:
  • 3-3-3-3
  • 3-6-3
  • 1-10-1
  • After upstacking and downstacking –
  • Rotate to the right and begin the next stack.
  • Continue until everyone is back to their starting position.

Shuttle Relay

  • Students stand in shuttle relay style.
  • Cups are set up in the middle of the gym with one stack for each team. (in line with their team position)
  • Teacher designates a stacking formation:
  • 3-3-3-3
  • 3-6-3
  • 1-10-1
  • On the signal, the first stacker runs to the middle and stacks up.
  • Then they run to their teammates on the opposite end of the gym and give them a “five”.
  • This stacker goes to the middle and down-stacks.
  • Continue until everyone is back to the starting position, or…
  • Set a time, such as 2 minutes and see how many stacks can be made in that amount of time.

Scooter Relay

  • Students are lined up in teams in relay style with a partner.
  • Each team has two scooters linked together.
  • Each team has downstacked cups in the middle of the gym floor and at the opposite end.
  • Two students from each team will take turns as the pusher and the rider.
  • One partner from each team is sitting on the scooter, with feet extended forward
  • The other partner (next in line) will be pushing.
  • One set of 6 cups is on middle gym line.
  • Three sets of three cups are at the opposite end of the gym.
  • Students are pushed on the scooters to the center stack – up-stack the three sets of three.
  • Then, travel to the opposite end and up-stack the 6 cup stack
  • Now partners switch places and the new “rider” will down-stack the same set of cups.
  • Return to the beginning of the line and pass the scooters to the next partners in line.
  • Continue until everyone has had a turn up-stacking and down-stacking.
Print Friendly, PDF & Email

Rotating/Stationary Line Pass

Line Pass (Stationary Line/Rotating Line): Get a lot of practice passing balls/ etc. with a variety of partners

Setup/Equipment:

  • Line up the class so that there are two lines facing each other about ten feet apart.
  • Spread out, so everyone is directly across from a partner.
  • For K-2,  it helps if each participant has a polyspot to stand on. You may want to use playground balls rather than basketballs.

Guidelines:

  • One line is the Stationary line – each person in that line gets a ball. They are in charge of the ball and always hold it during transitions.
  • The other line is the rotating line – they will rotate down to the next person in line during the transition music.
  • MUSIC:  I set up a playlist of about 20 songs and set the time for 40 seconds. Then I place a transition song that repeats between songs that is about 10 seconds long.
  • Start music:  Students pass the ball back and forth. Start with a bounce pass which is usually more accurate and easier to catch.
  • Rotate: After the songs ends there is a ten second transition song for the person at the end of the rotating line to run up and take their place at the beginning of the line. Everyone else in the rotating line moves down one place.
  • Reminders: A good pass is one that your partner catches. How many passes can you make in 40 seconds.
  • Adjust the length of the pass according to each grade level. Then adjust during the activity for each grade level.
  • Vary the style of passes: Bounce, chest, overhead

Variations: Stop the activity at any time to make changes. The stationary line now gets a chance to run over and make the change this time. Here’s some possibilities:

  • Chest Pass with Playground Balls/Basketballs
  • Bounce Pass with Playground Balls/Basketballs
  • Beanbags
  • Foam balls
  • Deck Rings
  • Footballs
  • Spinjammers/ Soft Frisbee
Print Friendly, PDF & Email

Tunnels

Equipment and Setup:

  • (Use Soft Soccer style ball or beanbags )
  • One ball or beanbag for each student
  • Chose partners – Decide who will be the tunnel to start the activity. The partner will be moving around the gym and try to close all of the tunnels by moving their ball or beanbag through tunnel.

Guidelines:

  • The people who are “tunnels” may pass a ball to themselves in the air, while the other students are dribbling their balls. If you’re using a beanbag, the tunnel can just throw and catch with themselves.
  • The partner will get a ball and begin to dribble with their feet in the playing area. If you’re using a beanbag and just throw and catch in the air, or practice sliding it.
  • When the activity begins half of the students will dribble their balls on the floor, and attempt to pass a ball through as many tunnels as possible. If you’re using beanbags, you’ll slide it through the legs.
  • The “tunnel” students should count how many balls or beanbags pass through their legs.
  • When five balls or beanbags have passed through a tunnel, that tunnel is closed and they sit down.
  • When all of the tunnels are closed, everyone sits down.
  • Partners connect with each other and change positions. There are new tunnels and new people moving to see how quickly they can close all of the tunnels.
  • Teacher may time students, then see if they can improve the time it takes to shut down all of the tunnels.
  • Variation: Tunnels open and close (jumping jack style)
Print Friendly, PDF & Email

Basketball Game: Recycle the Basketballs

Setup and Equipment:

  • Six Relay teams and one baton or ball to designate current runner.
  • One hula hoop for each team (in the middle of the gym in line to the opposite wall).
  • About thirty balls are in barrels or on a ball cart near the opposite wall.

Rules:

  • On teacher’s signal, one student from each group runs to the original stash of balls at the opposite wall and dribble one ball to their teams hula hoop.
  • The dribbler then runs back the their team’s line and hands them the baton.
  • When all of the balls are gone from the original stash, players may now take them from the other team’s hula hoops.
  • Students may not take balls from the hoops that are directly next to them (on either side)
  • There is no guarding of the hoop
  • Dribbling challenges such as changing from dominant to non-dominant hand or doing a crossover dribble may be added.
  • The object of the game is to have as many of the balls in your team’s hoop when the teacher signals that the game is over.
  • When the teacher stops play, the second phase of the game begins.
  • Now, players will return the ball to the ball rack one at a time. The other teams may help the team with the most balls to return their balls.
Print Friendly, PDF & Email

Effective Teaching and Management

The number one problem in the classrooms is not discipline: it is lack of authentic learning tasks, procedures, and routines”.   Harry Wong Former National Teacher of the Year.

Procedures and routines are utilized in our P.E. classes by designating a  gym home for each student. The gym home is essentially like a classroom desk where a child begins and ends their day.  The Edison gym is set up to visually facilitate classroom management through walls that are painted with the four primary colors and color coded squares on the floor that are the  ”gym homes”. for each student. The floor is designed by spacing out squares in six lines, with each line a different color team. Once they know where their gym home is all the teacher has to do is say the words, “gym home” and students know exactly where to go. The color teams allow for the teacher to quickly break the class in half or assign each color team to a station (when there are six stations). Creating this kind of  predictable environment empowers students and leads to better learning outcomes.

82 % of teaching communication is nonverbal   Patrick Miller NEA Research

With the level of excitement and the amount of movement in the gym, it is essential for the teacher to have some nonverbal cues to immediately move students. Traditionally,  blowing a whistle or raising your voice is used to get the attention of the class.  In this class you will learn how to use music as a major component of classroom management in the gym. The teacher introduces what the students will be expected to do whenever they hear a certain the song. The students may need to practice or role play the particular skill. For example, when it is time to pick new “its” for a game, the music changes to a different song (I find that popular movie themes work well).  Once the students know the cue, the transition is often completed without verbal directions from the teacher. Whenever a teacher is able to utilize nonverbal cues to manage behavior, their voice is saved for teaching.

Print Friendly, PDF & Email