Water Balloon Toss for Field Day

Setup and Equipment:

  • Small round balloons. At minimum, you could fill one balloon for every two students.
  • When we have  eight classes, fill up at lead twenty balloons for each class. That about 160 balloons. You can double that number if they break easily.
  • Fill balloons so that they would be easy to throw and catch fit in the palm of one hand.
  • Fill the balloons ahead of the event and store in pails or laundry baskets.
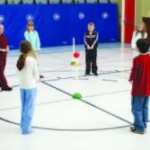
Guidelines:

  • Make two lines: One line is the stationary line and one is the rotating line. Do these lines for third grades and above.
  • Line up red and blue teams next to each other in one line.
  • Line up yellow and green in another line facing the other line about shoulder width apart.
  • The person across from you will be your partner. Adjust the lines, so that everyone has a partner.
  • Walk down the line and hand one water balloon to everyone in one of the lines.
  • Do not throw the balloon until the signal from the leader.
  • When the leader gives the signal, throw the water balloon forward and back.
  • Take a step back and toss the water balloon again, forward and back.
  • Wait for the leader to signal when it is time to move back one step.
  • Then, wait for the leader’s signal before throwing the next water balloon.
  • Continue as long as you can!
  • For the older kids add having the rotating line move down one person after each toss.
  • The person at the end, then runs to the beginning and has a new partner to toss to.

      The Most Fun Is Still Winning!


Partner Ball Relays

Setup and Equipment:

  • 4 red, blue, yellow, and green cones.
  • The red cone faces the blue cone about 10 – 15 feet apart. The yellow and green teams line up next to the red and blue teams. The red and blue teams will form partners with each other. The yellow and green team will form partners with each other.
  • 2 playground balls and some alternative balls for primary grades.

Guidelines:

  • Teams line up behind the red, blue, yellow and green cones
  • One ball starts with the red team and the other ball starts with the yellow team.
  • The first two people on the red and yellow teams step up.
  • Round One: Partners are given one ball, which they move the ball by balancing it between their backs as they move to the opposite side.

○     Now the next two people in line on the opposite side get ready to receive the ball.

○     Continue to move the ball until everyone has completed a turn.

  • Round Two: Balance the ball between your shoulders.
  • Round Three: Balance the ball between your hips
  • Round Three: Balance the ball between your stomachs.

Challenge: Can you pass the ball off from one set of partners to the other?


1. Polyspot Basketball – Field Day

Setup and Equipment:

  • Line up a red and blue cones in front of one basketball hoop  and the yellow and green cones in front of the other hoop about 30 feet from the hoop (just outside the free throw circle) facing the basket.
  • A pile of polyspots are lined up on the free throw line.
  • Students line up behind their color team cone to start.

Guidelines:

  • One basketball is given to the first person on each team. Note: We have basketballs that match the color teams.
  • On the start signal, one player from each team will dribble up to the basket and shoot the basketball.
  • If they miss the shot, they have one more opportunity to make it.
  • If both shots are missed, they must dribble back to their relay team and pass to the next player in line.
  • If the shot is made on the first or second try, the player should pick up one of the polyspot and bring it back to their team.
  • Dribble the ball back to your line and pass it to the next player, then go to the end of the line .
  • Remind players that they must dribble to and from the wherever they shoot the basketball from.
  • At the end of the game, teams may count up their points.
  • If the game is going slowly, you can add one basketball for each team, so more people are getting turns at the same time.
  • The Most Fun Wins!

Earn Points Variation:

  • Set up the spots before the game starts, you may have some students help with this. Choose two colors (for example green and yellow) spots and set them up farther from the basketball hoops. These spots are now worth 10 points each.
  • The rest of the spots that are located closer to the hoops are now worth 5 points each.

Fill the Bucket!

Setup and Equipment:

  • Four empty water buckets: One for each team at the opposite end (20 ft.)
  • One big container of water in the middle
  • 16: Small cups to carry the water in
  • One red, blue, yellow, and green cones or spots to designate teams.
  • Line up, relay style behind the cones, with all teams facing  the buckets at the other end.

Round One: Run to fill the Bucket:

  • Teams line up behind the cone or spot of their color team for directions:
  • The first person on each team has a cup to carry water in.
  • “Go”
  • Run to the center water container, dip your cup to get some water, now run to the bucket at the opposite end and dump it into the bucket.
  • Run back, hand the cup off to the next person in line and go to the end of the line.
  • Continue until one team fills the bucket.
  • Remember the most fun WINS!
  • When the cup gets to the last person in the line, they run all the way back up to the front, where the pattern of over/under passing continues.
  •  When everyone on the team has returned to their starting positions, they should sit down.
  • Continue to take as many turns as you can in five minutes.
  • You can do some comparison of the buckets to see who has the most, if it seems important to the group.

 Round Two: Bucket Brigade:

  • Team members stand side to side, next to each other:
  • One full bucket at one end. One empty bucket at the other end.
  • “Go”
  • Pass the full cup of water down your line, passing side to side.
  • When it gets to the last person in line, they put the water in the bucket, then run with the empty cup to the opposite end and fill the cup with water and send it down the line.
  • You may want to add additional cups, to fill the bucket faster.

Additional Ideas: If you finish the relays, you could repeat one of them, to see if they could do it faster.

Pass the Water over your head and to the person behind You.                           Good for Hot Day!


Four-Way Tug of War

Four Way Tug of War

four way tug of warSetup and Equipment.

  • One Tug of War rope that has four ropes that are red, blue, yellow and green.
  • Cones are set up around in a 4 foot square with one cone in the center.
  • Each team lines up and holds their color team’s rope.

Guidelines:

  • Everyone lines up and grabs their team’s rope
  • Make sure the teams are lined up, (like the picture above), so their weight is evenly distributed.
  • Leader stands near the center and gradually have the teams start to pull the rope towards them.
  • The object of this game is to have the center square of the rope move past the designated square identified by the cones.
  • When this area is breached, the game stops and each rope is rotated to the right, so they are now replacing the team that was on their immediate right.
  • A new game of tug of war begins…

Variation

  • Mix teams by having the last two people on each team move to the team on the right and move to the front of that line.


2. Plutonium Transfer and Ball Ladder

2.Plutonium Transfer and Ball Ladder

Line up Teams behind their cones: red, blue, yellow, green
Teach both games to begin, start one group on plutonium transfer, then when they’re done, they can start on one of the ball ladders.
Plutonium Transfer: A Team Building Activity
Your mission is to move the plutonium from the nuclear power plant to a safe storage facility.

Setup and Equipment.

  • 1 metal ring with 8 handles connected with a 5 ft. string

plutonium transerm pic

  • Four Cones: red, blue, yellow, green

Guidelines:

  • The plutonium transfer apparatus is set up with the ring resting on the base with a pole in the middle and a ball on top.  Eight strings with the four colored handles are stretched out so that there are no overlapping strings. The other base 5-15 feet away depending on the age of the group.
  • Each color team lines up in relay style (single file line, everyone facing the same direction).

Guidelines:

  • The first person and second person on each team step to the plutonium transfer site. Their mission is to carefully move the plutonium from the atomic energy plant to the safe storage facility.
  • They should each go to one of the handles that matches their color (red, blue, yellow, green.
  • When the 8 people are ready they can slowly try to lift the ball up together, then try to walk without dropping it to the safe storage.  On their first turn, if they drop the ball they should take everything back and lay out the string, handles and the ball in the same way it was when they started.
  • If a team makes it all the way and is able to put the plutonium on top of post, they should  rest the string and handles on the floor.
  • The next team of 8 now, does the same thing. Continue until everyone completes a turn. 
  • Once students have a turn, it’s time to move to the Ball ladder

Variation: Use different sized balls.

__________________________________________________________

2. Ball Ladder: A Team Building Activity

Move the ball down the steps of the ladder.

Setup and Equipment.

  • 2 ladders with four steps: eight people per ladder
  • 2 yoga balls
  • 1 ball
  • Four Cones: red, blue, yellow, green
  • Line up in color teams at the cones to start


agility lladder picyoga ball pic


Guidelines

  • Start two teams at each ladder (4 on each end)
  • There are four ropes on each end of the ladder.
  • Put the ball on one end (the last step) of the ladder.
  • Once you get it balanced, see if you can slowly roll it down the ladder. One team will need to lower their end, while the other team raises their end up.
  • It helps if the people holding the ropes spread far apart from each other.


Limbo and Hula Hoops

Limbo dancing is a dance that is originally from the island of Trinidad, although Hawaii is often mistakenly referred to as the birthplace of the Limbo dance.


 Setup and Equipment.

  • Limbo Pole 3 ft.
  • Limbo Music
  • Single file line starting with the Green, followed by yellow, blue, then red

 Guidelines

  1. Stand two feet from the stick, bend your knees, and lean backwards so your chest is facing up. Inch your way toward the stick
  2. Shimmy your body back and forth while leaning backwards. Try not to touch the stick or lean forward.
  3. Once you’ve made it through, you may circle around back to the end of the line and try going lower.
  4. When you  miss (everyone will eventually!) Just cheer on your classmates or try some hula hoop tricks.

Depending on Time: Leaders might want to have the Yellow and Green teams do the limbo and the Red and Blue teams hula hoop for a couple of minutes, then switch.