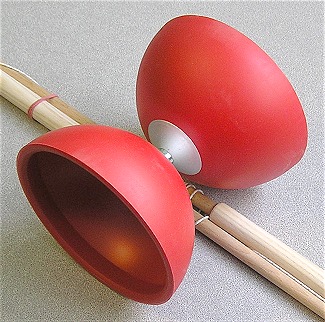
Pajaggle


Pajaggle Stacks

  • Hold up a Pajaggle (large foam puzzle piece) and show the students that the outside piece is the ring. Click Pajaggle for more information.
  • The inside piece is the insert. If there is a still smaller insert, this is called a mini insert.
  • Note: Use your hand only whenever you are removing an insert from a ring.

Activity: Team Pajaggle

  • Distribute a class set of Pajaggles (Large foam puzzle pieces) at one end of the gym.
  • Separate the rings and the inserts.
  • Relay: Line up the classes in four equal lines at the opposite end.
  • First person on each team gets ready to run.

Guidelines:

  • On the  teacher’s signal, students run to the end of the gym and pick up one ring.
  • They run back to their line and give a high five to the next person in line.
  • The second person in line will pick up an insert that they think matches the ring.
  • If it fits, the next person in line runs down and gets a new ring.
  • If the insert does not fit, the next person in line returns the insert and tries to find another one that fits.
  • This continues all of the pieces are gone.

Game: Chasers and Puzzlers (This event is timed)

Setup and Equipment

  • The class is divided in half.
  • One half of the class are the chasers and the other half is the puzzlers.
  • The puzzlers sit around the center circle in the gym.
  • The pajaggles are set up at one end of the gym with the inserts taken out.
  • The chasers line up their relay teams, so they can easily pass beside the puzzlers in the center of the gym.

Guidelines:

  • On teacher’s signal, the chasers run one at a time to pick up one piece at a time and hand it off to the puzzlers.
  • The puzzlers will begin to put the pajaggles together in one giant puzzle.
  • Chasers continue running until all of the pieces are in the center of the gym.
  • Puzzlers continue until the giant puzzle is put together.
  • The teacher stops the time when everyone is sitting down and the puzzle is completed.
  • For a Challenge: Classes may compete against each other, to see who has the lowest score


Go to the Pajaggle Website for more information.

Print Friendly, PDF & Email

P.E. Game: Chasers and Puzzlers


Pajaggle Stacks

Setup and Equipment

  • The class is divided in half.
  • One half of the class are the chasers and the other half is the puzzlers.
  • The puzzlers sit around the center circle in the gym.
  • The pajaggles are set up at one end of the gym with the inserts taken out.
  • The chasers line up their relay teams, so they can easily pass beside the puzzlers in the center of the gym.

Guidelines:

  • On teacher’s signal, the chasers run one at a time to pick up one piece at a time and hand it off to the puzzlers.
  • The puzzlers will begin to put the pajaggles together in one giant puzzle.
  • Chasers continue running until all of the pieces are in the center of the gym.
  • Puzzlers continue until the giant puzzle is put togeteher.
  • The teacher stops the time when everyone is sitting down and the puzzle is completed.
  • For a Challenge: Classes may compete against each other, to see who has the lowest score

Visit the Pajaggle website for more information:

Go to the Pajaggle Website for more information.

Print Friendly, PDF & Email

Capture the Targets


Setup and Equipment:

  • Players are divided into two teams.
  • Each team has a different colored jersey.
  • The wall for each team has a gym mat in it, this is the “Cooler” for the opposing team.
  • Six foam targets are placed at each end of the gym (inside of a hula hoop). It works best if the team with the blue jerseys are retrieving the blue targets, etc.
  • The area between the wall and the endline is the designated safe area for opposing players attempting to retrieve their pin. Only one player from the opposing team may be in the safe area at a time.
  • The Object of the Game: Players attempt to remove the pins from the  opposing team’s endline and return them to their own endline.
  • The Game is Over: when all of the pins have crossed the line and are in their team’s safe zone.

Guidelines:

  • Students are safe on their own side.
  • If a player crosses the center line they may be tagged by the opposing team.
  • Tagged players are frozen until a teammate reaches them and grabs their hand.
  • They both are allowed free walk-backs to their side, as long as they are holding hands and have their hands raised in the air.
  • Players that reach the opposing team’s targets are safe as long as their hand is on the pin and they remain behind the line in the safe zone.
  • If the player removes their hand from the targets, the opposing player may tag them and the target stays at that spot. The tagged player goes to the “Cooler”.
  • As soon as the target leaves the safe zone line the player may be tagged. The target is set down at this spot. The player who was carrying the pin, then returns to their side.
  • Only one player at a time may be in the safe zone. If two players are in the safe zone at the same time, they both must go to the “Cooler”.
  • A player that is tagged while carrying a pin must set the target down at that spot and go to the “Cooler”.
  • Targets may never be thrown.
Print Friendly, PDF & Email

Diabolo

Diabolo

Diabolo Tricks Link

  • Start by setting the diabolo on the string and then on the floor to your right.
  • Set the diabolo in front of your right foot, stand up and move to farther to the right if possible.
  • The farther the diabolo is set to the right of you, the more spin possible. (Note: lefties will need to set the diabolo to the left)
  • Before rolling the diabolo, stand pointing your sticks at the diabolo off to your left. The string should be hanging from sticks to diabolo. If not position the diabolo even farther right.
  • Roll the diabolo across the floor in front of you. Start your roll slow, but accelerate faster as the diabolo moves left.
  • As the diabolo reaches a point in front of you (before your left foot’s position); gently lift the diabolo up with both sticks.
  • The diabolo should be spinning counterclockwise.
  • Try to center the diabolo and begin to pull harder with the Right handstick.
  • Practice goals are to reach a medium speed without causing the diabolo to swing wildly after the pickup.

Tips:

  • Once you know how to get the diabolo spinning, the next problem is to keep it from tilting.
  • If the diabolo’s near cup is tilted down toward you, put your right stick forward. You can keep pulling with your stick forward to keep your speed up as you correct.
  • If the diabolo’s near cup is tilted up toward you, put your right stick back. You can keep pulling with your stick back to keep your speed up as you correct.
Print Friendly, PDF & Email

P.E. Game: Ball Frenzy Games – Three Variations

Soccer Frenzy – Ball Frenzy – Super Ball Frenzy

1. Soccer Frenzy: Kicking only – Including Goalies

2. Ball Frenzy: Throwing only – Goalies may use hands and body

3. Super Ball Frenzy: Throwing and Kicking allowed. Goalies may also use hands and/or kick

Setup and Equipment:

  • Twenty pins are lined up on the black lines in front of the opposing walls.
  • It works best to pick a couple of students to begin setting up the targets while the rules are covered and the teams set.
  • Break class into two teams. In our gym we have four teams (red, blue, yellow, green). So it’s pretty easy to put two teams on each side.
  • The dividing line in the middle of the gym cannot be crossed
  • Each team has twenty pins that are defended by goalies on their team.
  • Each team starts with an equal number of soft foam balls.(between 10-15 works well)
  • Players sit in front of their targets and wait for the music to start to begin the game.

Guidelines:

  • The object of the game is to knock down all of the targets on the opposite  side of the gym.
  • The balls may be thrown or kicked, depending on which game you’re playing.
  • No balls may be knocked out of the air with a thrown ball
  • When a targets is knocked down, it works best if it is immediately put into the container that it came from.
  • Note: For K,1,2 they often choose to put the targets back up.
  • Players may switch on their team between protecting the targets and throwing at the other team’s targets.
  • If a goalie accidentally knocks over targets, they must stay down
  • Switch ends of the gym after all targets are knocked down.

The Most Fun Wins!

Print Friendly, PDF & Email

Skill Practice/Activity: Group Juggle

Setup and Equipment:

  • A variety of balls and other objects can be used. Doing  a bounce pass with a basketball is a good place to start. Students are spaced out around a square grid such as a four square floor design.

Guidelines:

  • Team of players are set up at the corners and lines outside of a four square floor design. For larger groups everyone will need to take a step or two back to accommodate everyone.
  • The first player passes a ball to someone across from them (Note: Not next to them unless they are the last player)
  • The second player passes the ball to someone across from them.
  • This continues until everyone has the ball at least one turn.
  • It is important to remember who passes you the ball and who you will be passing to.
  • To learn names, you can also have students call out the name of the person they are passing to.
  • After your team can successfully pass the ball in a continuous fashion, the starter may add another ball.
  • Additional balls can continue to be added as long as the team is successful.

Tip for Success: Do not watch the ball – watch the person that passes you the ball.

Print Friendly, PDF & Email

Warmup: Toe Knee Chestnut

Equipment and Setup:

Go to the Learning Station Web Site for the Original Movements and Lyrics.

1. Tony Chestnut knows I love you.   Point to your toes, knees, chest, head, nose, eyes, heart and straight ahead.

2. Tony knows.  (Tony knows.) Point to your toes, knees and nose.

3. Tony Chestnut knows I love you.  Point to your toes, knees, chest, head, nose, eyes, heart and straight ahead.

4. That’s what Tony knows. Point to your toes, knees and nose.

5. Tony, Tony and his sister Eileen.  Stand and balance on one foot,  then lean to the right.

6. And Eileen loves Neil and Neil loves Pat.  Everyone lean to the right, kneel and pat your bottom.

7. But Pat still loves Bob. Bob your head up and down.

8. And there’s Russell and Skip.  Rustle up your hair, then one skip and hold a balance on one foot.

9. This song is silly, but it’s hip. Make a silly face (thumbs in ears and wiggle fingers), then stick out your right hip.

10. How it ends, just one man knows. Shake your end, hold up one finger, point to self, then flex your muscles.

11. And guess what (what), it’s Tony Chestnut.  Finger next to head (thinking).  Point to your toes, knees, chest and head.

  • Music will begin to move faster…
  • Repeat the lyrics and movements.

Tony Chestnut

From the CD, Tony Chestnut & Fun Time Action Songs

Copyright 1997, Monopoli/The Learning Station

www.LearningStationMusic.com

Print Friendly, PDF & Email

Frog Pond

Setup and Equipment:

  • Six groups of students are lined up relay style at one end of the gym.
  • Set a pail with beanbags at the opposite side of the gym.  Put the poly spots in a circle surrounding the the pail. Put the 5 point spots closest to the pail, the 10 point spots go next. The spots that are the most challenging are the 20 point spots which are placed the furthest out.
  • 20 points for yellow – 20 points for green
  • 10 points for red and blue
  • 5 points for purple- 5 points for orange
  • Each color team (6 teams) has it’s own beanbag and may only throw and retrieve that beanbag.

Guidelines:

  • On the start signal one player from each team takes their beanbag to a spot and tries to throw it into the pail in center of gym. One foot may be on the spot and the the other foot must be behind the spot.
  • If the player makes it into the pail, they will pick up the poly spot and take it back to their team. If a player misses the pail, they just run and pick up the beanbag and return it to the next player on their team, then go to the end of the line.
  • Play continues until all of the spots are gone. Players may want to add up their points at the end of the game.
  • The most fun wins!
Print Friendly, PDF & Email

Offense/Defense and Walking Tag

Find a partner

  • Everyone skips to the music, when the music stops, stand back to back with a partner.

Offense/Defense Tag

  • One partner on each team sits down.
  • The partner who is standing is the offensive player
  • The partner who is sitting is the defensive player.
  • The object of this game is for the defensive player to stay within one arm’s length to the offensive player, so that when the music stops they are within one arm’s length of their partner.
  • The teacher designates a locomotor skill: Skip, gallop, slide step, power walking, jogging.
  • The offensive player will try to lose the defensive player.
  • The defensive player will try to stay within one arm’s length.
  • When the music starts, the game starts. Players are moving around the gym in designated manner. Let the music go for no longer than 30 seconds
  • When the music stops, everyone must freeze immediately and the defensive player will extend their arm to see if they can tag their partner.
  • Switch offense/defense positions every time the music stops.

Walking Tag with Partners

  • This is a game where everyone is playing tag with partners at the same time.
  • Chose partners – One Partner: Raise hand. You will be “it” and begin walking around the gym.
  • Other partner: Close eyes and make three complete turns.
  • Open eyes and walk to try and find partner.
  • Students will tag their partner with a gentle tag on the back with two fingers
  • When a partner is tagged, students  switch roles.
  • After everyone has played for a couple of minutes, the teacher can give a reminder to the class that there are 30 seconds left, so if you haven’t had a turn in both roles, switch roles for the rest of the time.


Print Friendly, PDF & Email

Warmup: Meet and Greet

Setup and Equipment

  • Class breaks into partners – It works well to play music, then stop the music and have students stand back to back with someone near them.
  • Line up two lines with equal numbers of students
  • Initially you may want to  put Poly spots  down so that students are spread out equally.

Guidelines

  • Stand facing your partner with the middle line in the gym between you.
  • On the teacher’s signal, you will run to the wall in back of you, touch the wall,  and return to face your partner.
  • Each time you meet, the teacher will add a simple physical task for you to complete.
  • These activities will be cumulative. So, it is important to remember each task.

Here’s a Start:

  • High-five R hands
  • High-five L hands
  • Jump and turn 360°
  • Jumping high-ten
  • Elbow turn R and L
  • Do si do
  • Create your own
Print Friendly, PDF & Email