Warmup: Corners

Setup and Equipment

  • 4 Cones: Set up near each corner of the gym.
  • 4 Signs with various locomotor movements. (4 different movements on each card).
  • Set up an equal number of students to start at each corner.
  • Start the music to begin

Guidelines

  • Each group reads the top item on their list and moves in counterclockwise direction to the next cone.
  • At the next cone, read the first item and complete that movement to the next cone.
  • Continue completing the 1st item on each card until you reach your starting point.
  • Now, do all of the #2 items on each card, until you reach the starting point.
  • Continue this pattern until all four items on each card are completed.
  • You may start over on #1 and continue until the music stops
  • Walk
  • Gallop
  • Side-Slide (facing inside area)
  • Crab Walk
  • Jog
  • Power Walk
  • Skip
  • Grapevine
  • Tip-Toe Walk
  • Gallop (change lead foot each time)
  • Hop
  • Heel Walk
  • Invisible Jump Rope
  • Side-Slide (facing outside area)
  • Run
  • Print Friendly, PDF & Email

    Jump Rope Tag

    Setup and Equipment:

    • Jump Ropes and one end of the gym designated as the Jump Rope Area
    • Yarnball Taggers

    Guidelines:

    • Four or five people are chosen to be “it”
    • All other players have a “safe base” available to them at all times.
    • If a player wants to avoid being tagged, they simply have to be completing a
    • series of ten jumps with the “invisible rope style” when the tagger tags them
    • If a player is tagged they must complete ten jumps with a jump rope in the designated jump rope area.


    Print Friendly, PDF & Email

    P.E. Lesson: Fitnessgram

    FITNESSGRAM: is the national fitness test battery for youth. The assessment includes a variety of health-related physical fitness tests designed to assess cardiovascular fitness, muscle strength, muscular endurance, flexibility, and body composition.

    Personal fitness self-testing is considered to be the principal use for FITNESSGRAM test items. Students are encouraged to do their personal best and improve their “PR” on subsequent tests during each school year.

    Pacer: The Pacer running test is administered in the gym.  Students run from one end of the gym to the other (20m) at the pace of the CD. Students are allowed one lap to catch up if they fall behind the beep sound that designates the time allotted to for each lap. When a student does not make the lap in time, their test is over.

    pacer runner’s grid.xls Rather than have the whole class run at the same time, students pair up and tally for their partner on this sheet. One partner lines up at the starting line, while the other partner sits at the side of the gym and puts a line through each number as laps are completed.

    Print Friendly, PDF & Email

    P.E. Game: Ball Frenzy Games – Three Variations

    Soccer Frenzy – Ball Frenzy – Super Ball Frenzy

    1. Soccer Frenzy: Kicking only – Including Goalies

    2. Ball Frenzy: Throwing only – Goalies may use hands and body

    3. Super Ball Frenzy: Throwing and Kicking allowed. Goalies may also use hands and/or kick

    Setup and Equipment:

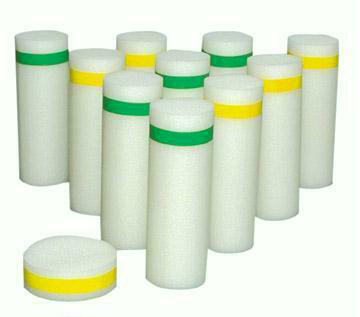
    • Twenty pins are lined up on the black lines in front of the opposing walls.
    • It works best to pick a couple of students to begin setting up the targets while the rules are covered and the teams set.
    • Break class into two teams. In our gym we have four teams (red, blue, yellow, green). So it’s pretty easy to put two teams on each side.
    • The dividing line in the middle of the gym cannot be crossed
    • Each team has twenty pins that are defended by goalies on their team.
    • Each team starts with an equal number of soft foam balls.(between 10-15 works well)
    • Players sit in front of their targets and wait for the music to start to begin the game.

    Guidelines:

    • The object of the game is to knock down all of the targets on the opposite  side of the gym.
    • The balls may be thrown or kicked, depending on which game you’re playing.
    • No balls may be knocked out of the air with a thrown ball
    • When a targets is knocked down, it works best if it is immediately put into the container that it came from.
    • Note: For K,1,2 they often choose to put the targets back up.
    • Players may switch on their team between protecting the targets and throwing at the other team’s targets.
    • If a goalie accidentally knocks over targets, they must stay down
    • Switch ends of the gym after all targets are knocked down.

    The Most Fun Wins!

    Print Friendly, PDF & Email

    Skill Practice/Activity: Group Juggle

    Setup and Equipment:

    • A variety of balls and other objects can be used. Doing  a bounce pass with a basketball is a good place to start. Students are spaced out around a square grid such as a four square floor design.

    Guidelines:

    • Team of players are set up at the corners and lines outside of a four square floor design. For larger groups everyone will need to take a step or two back to accommodate everyone.
    • The first player passes a ball to someone across from them (Note: Not next to them unless they are the last player)
    • The second player passes the ball to someone across from them.
    • This continues until everyone has the ball at least one turn.
    • It is important to remember who passes you the ball and who you will be passing to.
    • To learn names, you can also have students call out the name of the person they are passing to.
    • After your team can successfully pass the ball in a continuous fashion, the starter may add another ball.
    • Additional balls can continue to be added as long as the team is successful.

    Tip for Success: Do not watch the ball – watch the person that passes you the ball.

    Print Friendly, PDF & Email

    P.E. Lesson: Flying Disc

    Equipment and Set Up

    • Partners
    • One disc for each pair

    Backhand Throw

    • Place your thumb on top of the disc, and your index finger on the outside edge.
    • Curl your other fingers under the rim, and grip firmly.
    • To make your throw, turn your side to your target,
    • Point your throwing elbow at your target, and step toward the target with your front foot.
    • Extend your arm, and snap your wrist as you release, pointing at the target.

    Clap Catch

    • Hold hands out in front of you, one above and one below.
    • As the disc comes into your hands, “clap” it between them.
    • Keep your eyes on the disc as it comes into your hands.

    Two Hand Catch

    • Both hands in front; palms out; thumbs down.
    • Bring your fingers to your thumb as disc hits hand.
    • Alternate throwing and running/catching.
    • Use the two hand catch when you can.

    One Hand Catch

    • One hand in front; palm out.
    • Higher than waist; turn your thumb down. Lower than your waist; your thumb is on top.
    • Bring your fingers to your thumb as the disc hits your hand.

    Under the Leg Catch

    • As the disc nears, lift 1 leg high enough for the disc to fly under.
    • Catch with 1 hand behind your leg.

    Forehand Throw

    • Face your target
    • Throwing arm out to the side, away from your body.
    • Hold your thumb under the front side of the rim.
    • Curl your fingers under the front edge
    • Bring your throwing elbow to your hip.
    • Keep the disc parallel to the ground.
    • Flick your wrist as you release the disc
    Print Friendly, PDF & Email

    P.E. Game: Flying Disc (Frisbee) Bowling


    Setup and Equipment:

    • Flying Discs (One for each relay team),
    • Targets are set up in bowling formation at the opposite end.
    • Soft Foam Targets (25-30).
    • Teams are set up in relay style.

    Guidelines:

    • The object of the game is to be the team that knocks over the last target.
    • The winner is whoever has the most fun!
    • One player from each team runs to the center line and throws the disc and tries to knock over as many targets as they can.
    • Then, they retrieve the disc and run it all the way back to their line and hand off to the next person in line. Note: watch out so you don’t run in front of a thrown disc.
    • You can also use balls, beanbags, etc.
    Print Friendly, PDF & Email

    P.E. Lesson: Deck Rings

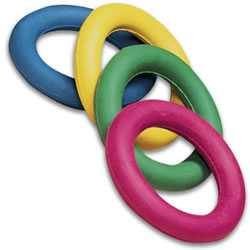
    Tossing:  Teacher led demonstration

    • Toss right – catch right.
    • Toss right – catch left.
    • Crossover – Left to Right, then right to left.
    • Toss – clap once, then twice, three times and catch.
    • Toss up, then catch in a kneeling position.
    • Toss up – make 1/4, 1/2, 3/4, then try a 360 degree complete turn.

    Tricks

    • Put deck ring between feet, jump and catch.
    • Toss deck ring up and catch on your foot.
    • Throw deck ring in the air and catch down your arm.
    • Partner toss – pass on a signal so both are in the air at same time.

    Fun with Deck Rings

    • Run in front of deck ring and pick up with one hand
    • Jump over your deck ring as it rolls- How many times?
    • Run along side deck ring and pick it up with your foot
    • Spin you deck ring

    Deck Ring Partner Tunnel Activity

    Setup and Equipment:

    • In Partners
    • One partner gets a deck ring, the other partner stands in tunnel style with feet wide apart.
    • Tunnels should spread out around the gym.

    Guidelines

    • On teacher’s signal the student that has the deck ring kicks the deck ring through the legs of as many “tunnels” as they can in one minute.
    • Switch and let the other partner try it.
    • Next time around, let the first partner kick it through the legs of as many people as they can, but this time the “tunnels” will sit down after they have had five of the deck rings slide through their legs. How long does it take to get all of the “tunnels” sitting down.
    • Switch and let the other partner try it.


    Deck Ring Tunnel Game

    Setup and Equipment:

    • Partners
    • Spread out around the gym.
    • One partner gets a deck ring, the other partner stands in tunnel style with feet wide apart.

    Guidelines:

    • On teacher’s signal:The partner is who is the “kicker” attempts to  kick the deck ring through as many tunnels (legs)  as they can in one minute (times may vary).
    • Switch and let the other partner try it
    • Next time around, let the first partner kick it through as many tunnels as they can, but this time the people who are the  tunnels will sit down after they have had five of the deck rings slide through their legs. How long does it take to get all of the “tunnels” sitting down.
    • The teacher may want to time this, then you can challenge the other partners to see if they can better the time.
    • Switch and let the other partner try it.
    • Variation: May also use foam balls or deflated soccer balls, etc.


    Print Friendly, PDF & Email

    P.E. Lesson: Getting Ready for the Jogathon

    Jog/Walk Progression

    • Add a lap each week starting the third week in April.
    • This will help prepare students for the Spring Jogathon and the 4th/5th Track Meets.
    • At Edison: Students run a half block, starting at the gym, then towards Onyx Street, down to 23rd, then back to Emerald and the Gym.
    • Jogathon Preparation: Give each student an index card and set the timer for 10 minutes (first class) 15 minutes (second class) and so on.
    • Mark off the cards with a marker for every lap that students complete.
    • OR… use a hole puncher to punch the index cards.

    To add interest and variety:

    • You can give students stickers will for each lap.
    • Read off the elapsed time when each student completes a lap.
    • Wear Pedometers: Estimate steps before running.

    Print Friendly, PDF & Email

    P.E. Game: Predator vs. Prey (Floppy Fish)

    Setup and Equipment:

    • Yarn balls or Ocean related taggers (stuffed fish, etc.)
    • Pick four people to be it.
    • One mat in front of each wall, these are five second bases (islands). You cannot be tagged while resting on an island.
    • The Taggers are the Predators,
    • Everyone else is the prey.

    Teach students how to do the floppy fish and shake.

    • Hands out like a regular handshake
    • Tap each other’s forearms with a floppy fish motion.

    Guidelines:

    • The object of the game is for the predators to tag as many people as they can and the prey to free each other.
    • The Predators start in the center circle, the prey  stands on a mat to start.
    • The prey can be tagged by a hand holding the tagging item, or when it is thrown.
    • If a person is tagged they become a fish and stand doing swimming motions (crawl, backstroke, tc.).
    • They can be transformed back to human, when someone gives them a floppy fish handshake.
    • Game continues, pick new Predators, every two minutes or so.
    Print Friendly, PDF & Email